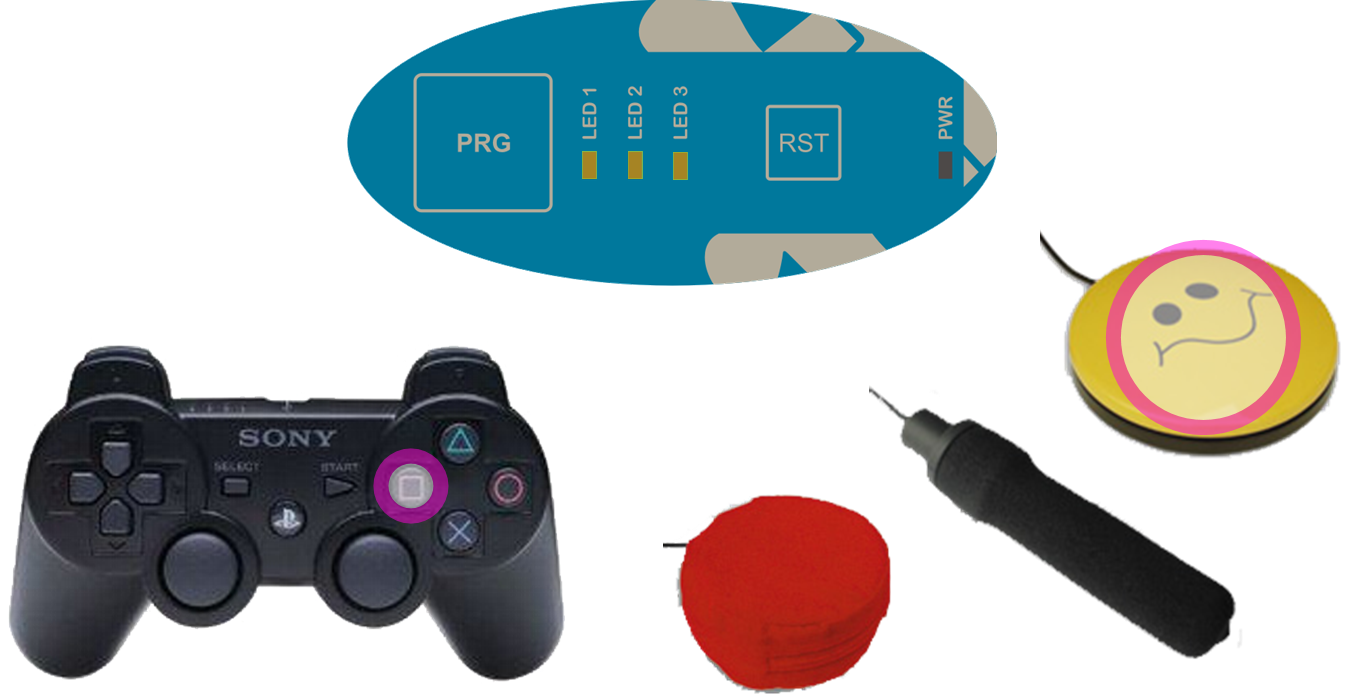
Mapping joypad functions
to switch sensors
The procedure of
mapping joypad functions to switch sensors is really friendly.
Due
to the many existing games and
the many relevant controlling functions, it may be required to
change the
factory default mapping between joypad controls and
switch sensors. When the user wants to
override default or previously made associations, the needed steps are
very simple; an example is shown in Figure 7.
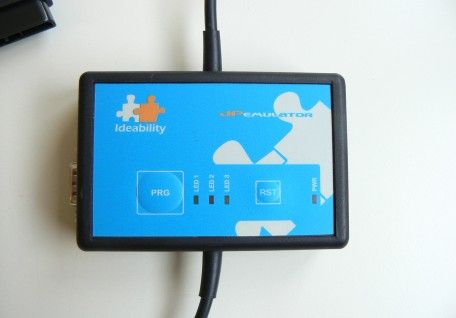
i) Press the
“Program” button (PRG) on
the device; the LED n. 1 begins blinking signalling
the
beginning of the
programming procedure;
ii) press the
joypad pushbutton
that should be associated to the desired switch sensor. After
a valid press, the LED n.2 starts blinking;
iii)
press/activate the switch sensor. A
brief blinking
of all signalling LEDs flags the procedure completion.
The
above procedure may be carried
out in just a few seconds for each external sensor.
Factory
default
mapping may
be restored at any time through a prolonged press
of the “Factory default”
button on the device.
As an example,
if in a soccer game the user wants to control the kick functions
(SQUARE button), steps to be taken are simply i) connect a single
sensor (no matter to which of the four sockets) or multiple sensor to
the JPemulator, ii) press the PRG button on the device (the LED n. 1
starts
blinking), iii) press the SQUARE button on the joypad (the LED n.1 stops blinking and
the LED n.2 starts blinking); iv) activate the switch sensor (all LEDs
blink
for a while). That's
all!
Settings for a
switch sensor connected to each particular socket are mantained
until overridden by a new mapping procedure for that socket.
The mapping procedure for a given switch sensor socket does
not affect
other sockets/sensors. Current settings are maintained when
the system is switched off.
|
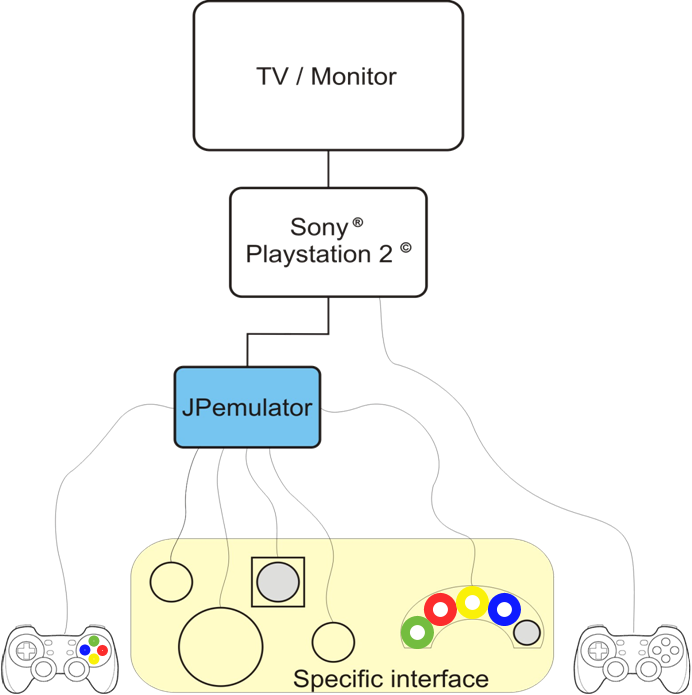
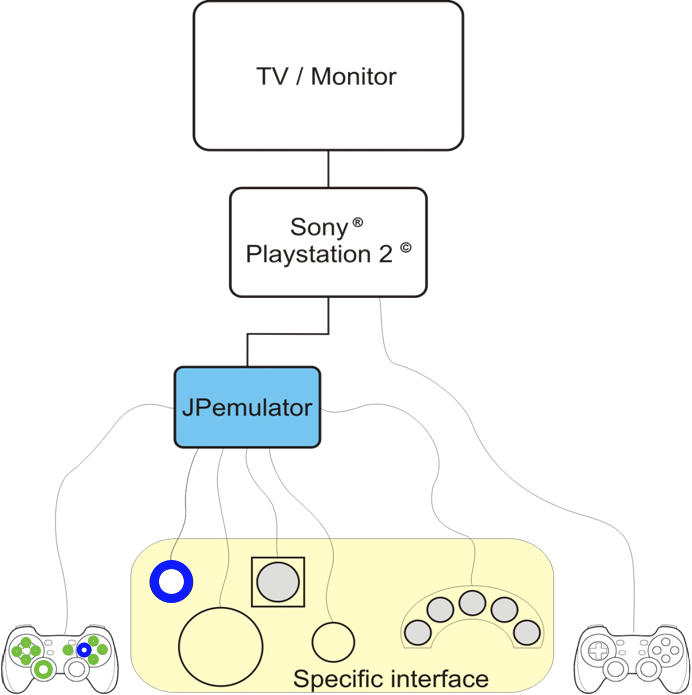
 In
this page a new device is presented allowing people with upper limb
impairments to play
with the Sony® Playstation®2 game
console by means of user-specific switch sensors and according to
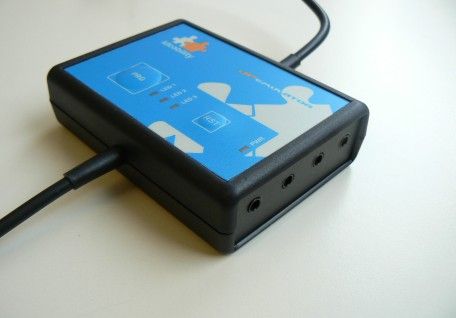
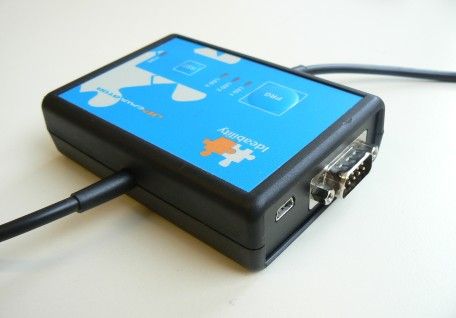
user's potential. Up to 4 single switch sensor with 3.5 mm
jack
connector and a 5-switch multiple sensor provided with DB9 connector
may be used
to replace up to 9 switch functions/controls of the original Sony® Playstation®2 joypad. The presented device must simply
be connected to the console and to the
original joypad, and requires no external supply. Through a very friendly
procedure, it is possibile to override factory default associations
(anyway mostly satisfactory) between switch sensors and joypad
functions; it is possibile to choose how many and which functions of
the
original joypad are controlled by means of specific switch sensors. No
technical skill is allowed to use the device. The original joypad
may be used by another player. Depending on user's
capabilities,
autonomous game, collaborative game (with a mate) and game against
another player (with or without a mate) turns out to
be possible.
In
this page a new device is presented allowing people with upper limb
impairments to play
with the Sony® Playstation®2 game
console by means of user-specific switch sensors and according to
user's potential. Up to 4 single switch sensor with 3.5 mm
jack
connector and a 5-switch multiple sensor provided with DB9 connector
may be used
to replace up to 9 switch functions/controls of the original Sony® Playstation®2 joypad. The presented device must simply
be connected to the console and to the
original joypad, and requires no external supply. Through a very friendly
procedure, it is possibile to override factory default associations
(anyway mostly satisfactory) between switch sensors and joypad
functions; it is possibile to choose how many and which functions of
the
original joypad are controlled by means of specific switch sensors. No
technical skill is allowed to use the device. The original joypad
may be used by another player. Depending on user's
capabilities,
autonomous game, collaborative game (with a mate) and game against
another player (with or without a mate) turns out to
be possible.